The source files of the code listings can be found in the folder samples next to this document.
|
Basic Concepts
Sequences and Steps
Sequences and Steps are the building blocks of the CaGe language. They encapsulate the test logic in a resuable manner. They can be composed together to create test procedures or to deal with test variants and even combinatorial aspects. They can be compared to function calls of programming languages like C/C++ or Java.
- Sequence
-
A Sequence can call other Sequences or Steps. The example below shows the basic syntax. Additionaly the call graph is depicted.
Syntax Call Graph Sequence InitialOnOffTest: // call to other sequences or steps setOn setOff ;
- Step
-
A Step contains actual test logic by defining a set of action and reaction, which is explained in detail in Action and Reaction. In constrast to Sequences it cannot call other Sequences or Steps. Therefore they are the leafs in any call graph.
Step setOn:
	// action and reaction
;
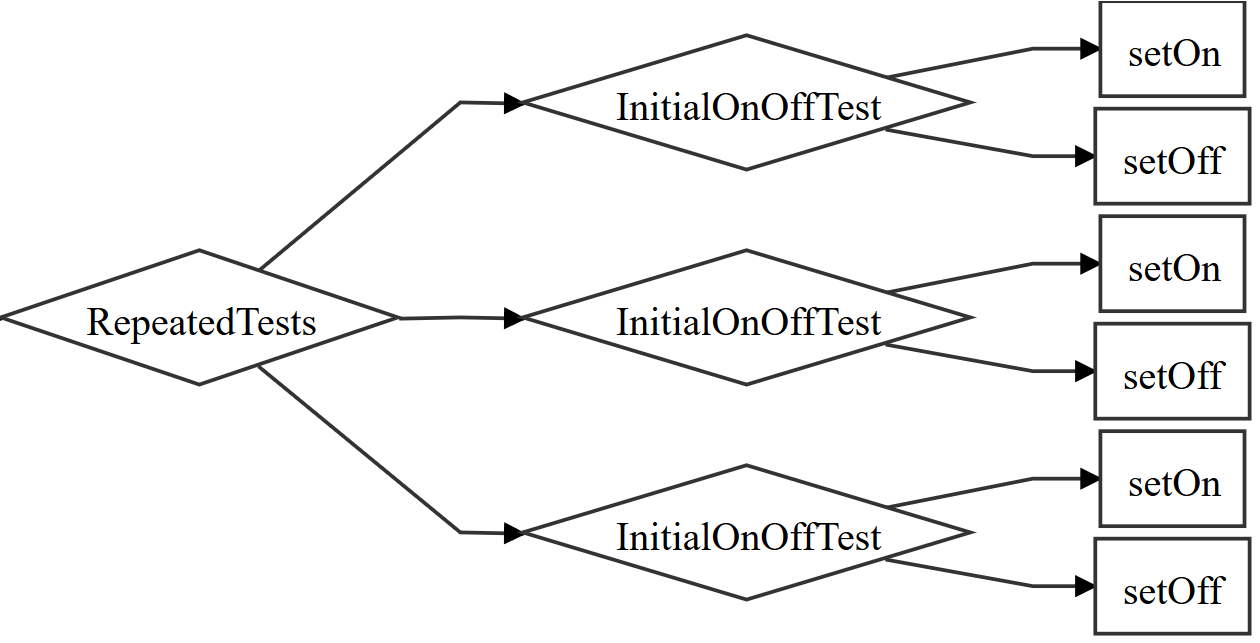
Test Paths
If a Sequence is executed, then the called Sequences produce a test path (or test tree). See the following example, where now InitialOnOffTests is called repeatedly.
| Syntax | Call Graph |
|---|---|
|

|
If the sequence is executed, the resulting test path will look like this:
Timeouts
A timeout can be used to protect the test from running interminably or to express a simple timing constraint. The timeout statement can be specified in Sequences and Steps and is always declared at the beginning:
Sequence RepeatedTests:
	timeout 100 ms
	// ...
;
The timeout is started when entering the sequence. It is raised as soon as execution time exeeds the specified time. Looking at the above example of RepeatedTests and assuming it now has a timeout of 100 ms, then the timeout is raised if the execution time of all its children is >= 100 ms.
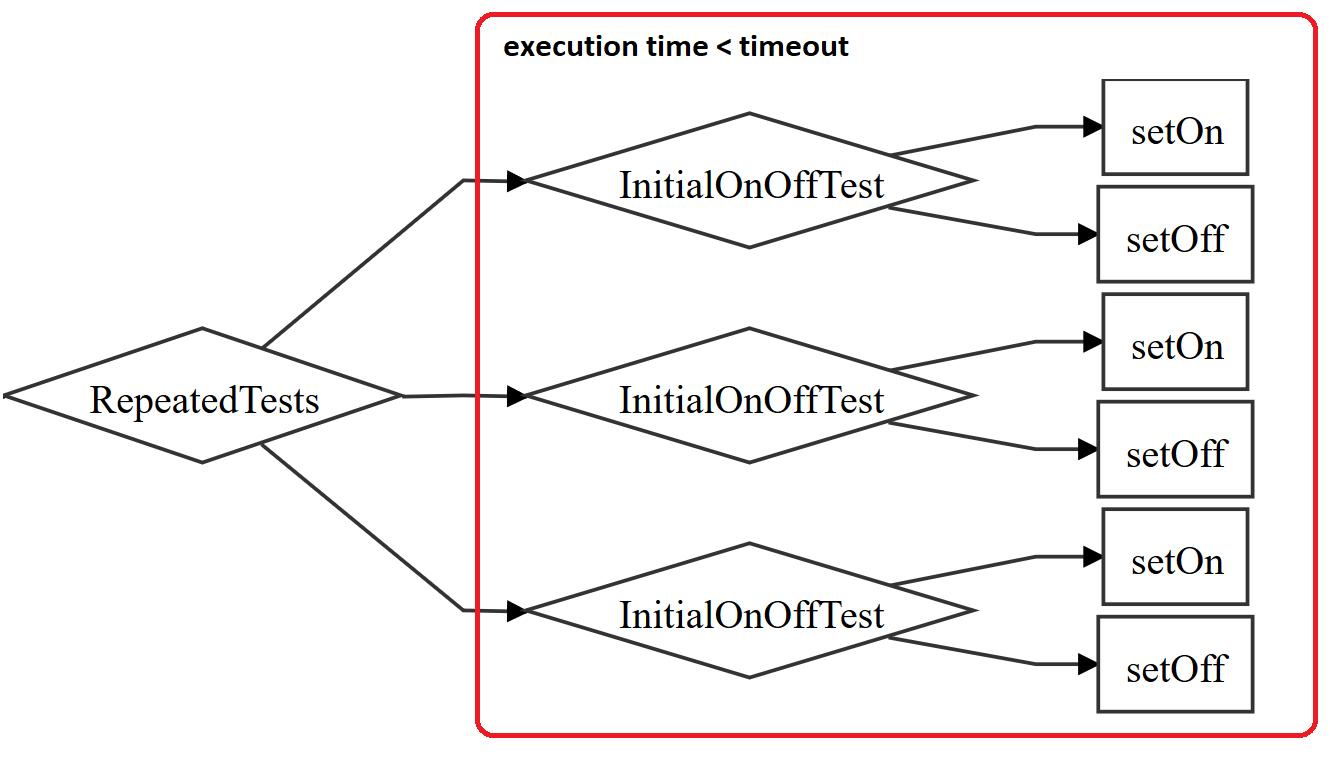
As soon as a timeout is raised, the execution is stopped immediately and the current test case is marked as failed.
Parameters
Sequences and Steps can declare parameters. This increases the reusability and allows to create simple combinatorics.
|
|
TestSuite and TestCase
Test suites and test cases are a known concept to testing, see Wikipedia test suite and test case and xUnit.
Occasionally, test suites are used to group similar test cases together. A system might have a smoke test suite that consists only of smoke tests or a test suite for some specific functionality in the system.
To follow this concepts, there is a special convention for the sequence at the top-level. The root Sequence is called TestSuite and its calls are implicitly acting as test cases.
| Syntax | Call Graph |
|---|---|
|

|
As a consequence, the test suites and test cases structure the output of the Text Logging. In addition they can be found in the XML test results, see xUnit format. Further, if a test fails (e.g. a timeout or expect failed), then the current test case is marked as failed. After that, the test execution will continue with the next test case.
| It is strongly encouraged to ensure that test cases are designed to be as independent and self-contained as possible. In particular, if a test case begins with a reaction block (either directly in a called step, transitively via one or more sequence calls, or called as part of if/for expressions) then this could lead to unexpected behavior like silently discarded messages. |
Action and Reaction
Stimulation and observation of the SUT (System under Test) is defined in a Step using action and reaction.

|
Step failure
The step can have two negative outcomes. First it can fail immediately if an expect is not fulfilled. Second, it can timeout when the step was not completed within the given time. In both cases the current test case will terminate and is failed.
|
|


Expects are unordered
The order of the received message does not matter. This allows the interaction with multiple components (ports).
But to enforce an order of messages, it is possible to chain reactions together.
|

|
Expect next
Expect next matches the next received message of the given type. This is the default behavior for message expect. Once fulfilled, subsequent instances of the messages are ignored. It fails immediately if the received data does not match the condition. If the message is not received, the step will timeout.
|
|


| next is a temporal operator of Linear temporal logic |
Expect finally
Expect finally awaits the given message until one instance does match the data condition. Once fulfilled, subsequent messages are ignored. If the message is not received or none is matched, the step will timeout.
The modifier can be used to await messages that are received without an explicit request, e.g. periodically. The following example shows an expect for a signal transition, where it is uncertain how many updates will be received until the expected value can be observed.

|
|


| finally is a temporal operator of Linear temporal logic |

Ignored messages
Messages that are not listed in the reaction block will be ignored. |
|

Also messages that are received during a wait period are ignored. |
|

State Transition Testing
State transition testing is a technique to generate combinatorial test cases. In the previous sections, test cases were constructed explicitly by chaining steps and sequences together. Instead, state transition testing uses a graph and a generation method to derive test cases.
State Transition Graph
The state transition graph consists of states and transitions, which represent the abstract behavior for a test. Every path in the graph from the initial state (top) to the final (bottom) is a potential test case.
The first example illustrates how test cases are modeled. It does not contain any test logic yet. The example is based on the simplified usage of a ATM. The test model represents the interaction with the ATM seen by the tester aka customer.
|
|

The graph contains five distinct paths, which can result to maximum five test cases.
-
TestCase 1: Insert card, (try) enter pin but cancel
-
TestCase 2: Insert card, enter wrong pin once and then cancel
-
TestCase 3: Enter wrong pin twice and deny access
-
TestCase 4: Enter wrong pin first, then correct pin and withdraw money
-
TestCase 5: Enter correct pin at first try and withdraw money

The next example shows the graph extended with actual test logic.
The transitions can be annotated with a list of Steps and Sequences like insertCard or checkMoney.
They can be implemented with Action and Reactions to stimulate or validate the desired behavior of the ATM.
|
|


Generated TestSuite
In order to create an actual test, the State Transition Graph must be generated to a TestSuite using the generated statement.
The test suite for the ATM example can look like this.
TestSuite ATMTestSuite:
	generate ATM n-switch = 0
;
The ATMTestSuite will contain the five generated test cases from the graph ATM. It can be added to a TestActor to obtain an executable test, see Instancing Test in eTrice.
To show the relation to a regular test suite, here is an equivalent version of the ATM example written by hand.
TestSuite ATMTestSuite:
	TestCase 1
	TestCase 2
	TestCase 3
	TestCase 4
	TestCase 5
; |
|
|
|
|
Combination and N-Switch
The State Transition Graph can contain an arbitrary number of distinct paths. If it contains shared path segments with branches or cycles and self-loops, then the number of potential transition combinations can be huge or even infinite. In order to select a meaningful and effective combination of transitions and to avoid unnecessarily exhaustive combinations, CaGe uses the n-switch generation method to select test cases. The level of the n-switch argument specifies the coverage of the transitions in the graph.
-
0-switch: Each transition has been traversed at least 1 time. This coverage contains the complete coverage of the states.
-
1-switch: All combinations of two consecutive transitions.
-
n-switch: All combinations of n+1 consecutive transitions.
The impact of the n-switch argument is shown in the following example. The example graph models a test for the debouncing of a button. The button under test can be in four states: down, up and short and long debounce. The graph contains cycles to repeat transitions between the states in order to increase the coverage level.
|
|

First the graph is generated for n-switch = 0, meaning each transition is covered, resulting in six test cases.
TestSuite DebouncingTestsSmoke:
	generate Debouncing n-switch = 0
;
To increase the coverage, the graph is generated for n-switch = 1, meaning each combination of two consecutive transitions is covered, resulting in 12 test cases.
TestSuite DebouncingTestsExtended:
	generate Debouncing n-switch = 1
;
The number of test cases rises rapidly by the increased coverage. Usually n-switch 0 to 2 are used for a meaningful coverage. The transition coverage can be considered exhaustive if it reaches the length of the longest path that can be found between the relevant states (the four button states).
| N-switch | Combination of consecutive transitions | Number of test cases |
|---|---|---|
n-switch = 0 |
1 |
6 |
n-switch = 1 |
2 |
12 |
n-switch = 2 |
3 |
23 |
n-switch = 3 |
4 |
43 |
n-switch = 4 |
5 |
80 |
n-switch = 5 |
6 |
148 |
n-switch = 6 |
7 |
273 |
n-switch = 7 |
8 |
503 |
Parameterized Graph
The state transition testing can be parameterized. The graph will be generated only once and called with arguments provided in the test suite generate statement. Given the Debouncing example above, the debouncing time for testing short and long press could be made configurable like this.
|

|
How-Tos
Execute Tests Manually
If the option useControlService=false is specified, then the generated TestActor will expose a port named cage_control.
This port can then be used to execute the contained tests from another actor.
The protocol is located in the eTrice modellib and consists of the following messages:
ProtocolClass PTestControl {
	incoming {

		/** Start test execution. */
		Message start()

		/** Abort test execution. */
		Message abort()
	}
	outgoing {

		/** Test execution finished or aborted. */
		Message done(success: boolean)
	}
}
The tests can be started simply by sending the message start. The TestActor will execute all contained TestSuites sequentially.
The following sample implementation triggers the start message in the IntialTransition. By that the test execution will automatically start after the system is initialized.
import etrice.api.testcontrol.PTestControl

ActorClass StartOnInit {
	Interface {
		// TODO create Binding to cage_control of test actor
		conjugated Port cage_control: PTestControl
	}
	Structure {
		external Port cage_control
	}
	Behavior {
		StateMachine {
			Transition init0: initial -> waitForFinish {
				action '''cage_control.start();'''
			}
			State waitForFinish
		}
	}
}
Instancing Test in eTrice
The CaGe TestActor rule automatically creates an eTrice ActorClass having the same name. In a .room file, it can be instanciated using the ActorRef rule as usual. Before that, it is necessary to import the CaGe file.
| CaGe | eTrice |
|---|---|
etriceAndCage/ExampleTest.cage
|
etriceAndCage/Application.room
|
Using C Code
CaGe does not define its own expression language, but instead relies on embedding target code to create statements with higher expressiveness.
The targetcode rule can be used to declare includes or common constants. This rule must be placed once in front of Steps and Sequences.
targetcode: ``
		#include <math.h>
		#include "TestHelpers.h"

		#define TIMEOUT_DELAY 50
	``
;
It is possible to put C Code in any statement that accepts an argument, e.g. time statements, message data or call of Step or Sequence.
Step time(int waitTime):
	timeout ``waitTime + TIMEOUT_DELAY`` ms
	action
		wait waitTime ms
;

Step message(int value):
	action
		port.ping(``value * 2``)
	reaction
		expect port.pong == ``value * 2``
;

Sequence calls:
	time(``TIMEOUT_DELAY``)
	message(``rand()``)
;
If the logic for test data requires a greater piece of code, there are two options. First it is to place complete lines of code in Steps.
Step inPlaceStyle():
	action
		``int pingValue = 1;``
		``printf("sending ping(%d)", pingValue);``
		port.ping(``pingValue``)
	reaction
		// c code must be inside of 'expect' due async nature
		expect port.pong => [ actualValue |
			``printf("received ping(%d)", actualValue);``
			``int expectedValue = 1;``
			expect actualValue == ``expected``
		]
;
The second and prefered way is to reference external functions.
Step externalStyle():
	action
		port.ping(``getPingValue(1)``)
	reaction
		expect port.pong => [ actualValue |
			expect actualValue == ``getExpectedPingValue(1)``
		]
;
Comparing Data
Comparing Numbers
Step number:
	action
		port.number(0)
		port.number(2)
		port.number(4)
	reaction
		expect port.number in range [0..1]
	reaction
		expect port.number in set{2, 3}
;
Comparing Structured Data
Structured data can be handled using target code statements, see Using C Code. The following example sends and receives a message of type DataClass:
Step dataClass:
	action
		// construct message data
		``MyDataClass data = {0, StatusEnum_OK}; ``
		port.someData(``&data``)

	reaction
		// expect message 'someData' and bind its data to 'rcvData'
		expect port.someData => [rcvData |
			// inline
			expect ``rcvData->id == 0 && rcvData->status == StatusEnum_OK``
			// using function
			expect ``checkOkay(rcvData)``
			// using expected data
			``MyDataClass expected = {0, StatusEnum_OK};``
			expect ``equals(&expected, rcvData)``
		]
;
Customize Failure Message
The reason statement allows to provide an additional message for an expect, that wil be printed upon failure.
Step customReasonText:
	action
		port.ping(1)
	reaction
		expect port.pong == 2 reason "Expected two but got something else"
;
It can also be written as target code to provide a custom string. This can also be a delegating function call. In any case, it should provide a valid string or null for successful compilation.
expect port.pong => [ data |
	expect data == 2 reason ``string_var_or_function(data)``
]
Organize into Files
The main structural elements of CaGe, TestSuite, Sequence and Step can be freely organized in separate files. For example it is possible to refactor shared logic into a library file. In general it is a good pratice to group elements by common concerns.
The example below demonstrates a setup with two TestSuites in different files and a library file with a shared Step. Also the TestActor is separated into an extra file.
organizeFile/TestsMain.cage
organizeFile/TestSuiteX.cage
|
organizeFile/
└── samples/organizeFiles
    ├── TestLib.cage
    ├── TestsMain.cage
    ├── TestSuiteX.cage
    └── TestSuiteY.cage
|
As seen above, CaGe provides the import rule for referencing files and putting their elements by namespace on scope. The import statement can be added automatically using the quickfix for unresolved elements:
Add Port or SAP
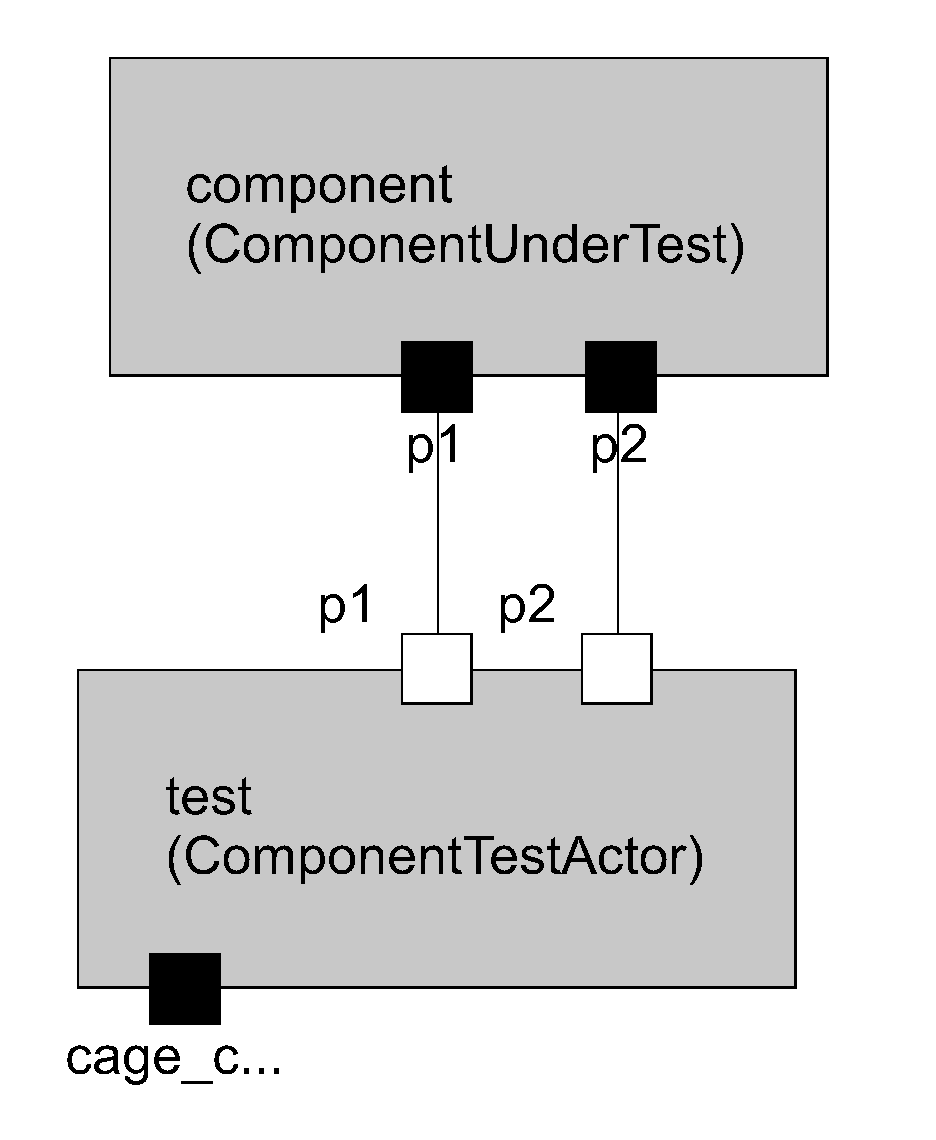
The interface of a CaGe test is based on eTrice Ports and SAPs. But they cannot be defined directly in CaGe. Instead the interface rule references an existing ActorClass, which ports are then are available to the CaGe test. This ActorClass is typically called port provider.
| CaGe | eTrice |
|---|---|
multiComponent/MultiComponentTest.cage
|
multiComponent/PortProvider.room
|
Reuse existing Ports
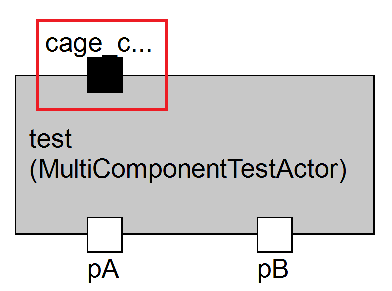
Whenever the test is tailored to a specific single ActorClass, e.g. Unit- or Component test, it is possible to reuse its ports without the need to redefine them in a port provider. The flag inverted will toogle the direction of its ports (regular to conjugated and vice versa). By that the test has automatically the opposite direction and can be connected to the component under test.
| CaGe | eTrice |
|---|---|
singleComponent/ComponentTest.cage
|
singleComponent/ComponentUnderTest.room
|
Write Documentation
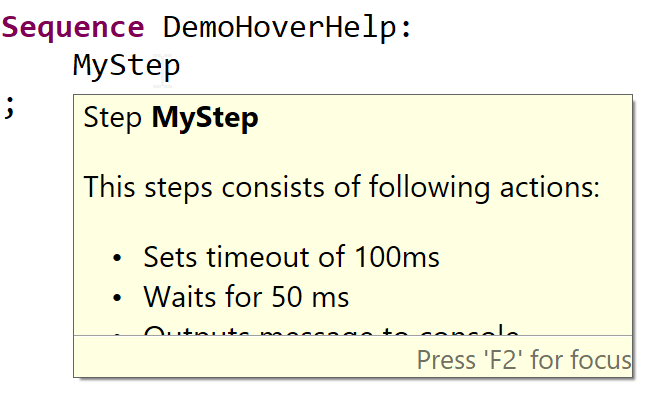
It is a good practice to document the tests. For that, it is possible to add comments to the CaGe elements similiar to javadoc or doxygen. The text can be formatted using html.
/**
 * The comments can be formatted using html. 	<br>
 * The result is displayed in the hover help.
 * Further the comments can be found in generated documentation.
 */
TestModel documentation.comments

/**
 * This steps consists of following actions:
 *
 * <ul>
 *  <li>Sets timeout of 100ms</li>
 * 	<li>Waits for 50 ms</li>
 * 	<li>Outputs message to console</li>
 * <ul>
 *
 */
Step MyStep:
	timeout 100 ms
	action
		wait 50 ms
	action
		``println("Hello from step.");``
;
The documentation text can be viewed live in the hover help. Given the example above, the hover help appears if the mouse is placed over the definition or any reference of MyStep.
Features
Data Types
CaGe has int, real, bool, char and string as built-in types. They are available for typing Parameters.
CaGe is using the eTrice types for message data. But some types are not supported in the language and have to be expressed Using C Code.
| Type | Parameter | Expression | Comments |
|---|---|---|---|
int, bool, char |
yes |
yes |
|
string |
yes |
yes |
implemented as char pointer |
real |
yes |
yes |
experimental |
eTrice PrimitiveType |
yes |
yes |
fixed-width types are simplified |
eTrice Enumeration |
use int |
target code |
|
eTrice DataClass |
no |
target code |
|
eTrice ExternalType |
no |
target code |
Text Logging
The CaGe text output is structured based on the executed TestSuite and TestCases. Below is an example output with all tests passing:
| CaGe | Output |
|---|---|
|
[--------] [ BEGIN ] TestSuite MotorSpeed [ RUN ] TestCase SmokeTest [ OK ] TestCase SmokeTest [ RUN ] TestCase CheckFullSpeed [ OK ] TestCase CheckFullSpeed [ PASSED ] TestSuite MotorSpeed [--------] 2 out of 2 executed test cases passed |
In case of a failing test, a message containing the reason is generated. The example below shows the message of a failed expect comparing integers.
| CaGe | Output |
|---|---|
|
|
After the reason follows the location of the failure. This is stated in form of the call hierarchy and is similiar to the stack trace of programming languages. The output lists the currently active Sequence or Step and the action or reaction block number. This number helps to narrow down the location within a step. Also it allows to distinguish between similar looking expressions. Below is an example in case of a duplicate expect statement:
| CaGe | Output |
|---|---|
|
|
In detail, CheckFullSpeed#3 denotes that the failure happend within the third action or reaction block of step CheckFullSpeed. Note that the single statements within the block are not listed.
The call hierarchy is applied to Sequences as well. This is useful to find the location of a failure in nested sequences. The following example shows the occurence of a timeout:
| CaGe | Output |
|---|---|
|
[ RUN ] TestCase SmokeTest Timeout expired! at FunctionsTests#2 (1) at CheckLEDs#2 <-- timeout (2) at RGBOnOff#1 (3) [ FAILED ] TestCase SmokeTest |
The sequence CheckLEDs declares a timeout of 100 ms for its complete execution. At the second call of RGBOnOff the total execution time exceeds 100 ms due the wait statements. At this point, the timeout is raised and the output is generated.
The lines list the calls of the nested sequences. The last line lists the currently processed step RGBOnOff, which is in the first action block at the wait statement. + The line is the origin of the raised timeout, which is indicated by ←- timeout.
PlantUML Sequence Diagram
The test sequences are written in a textual representation. In addition CaGe provides a graphical representation in form of sequence diagrams based on PlantUML. The diagram shows the interaction of the test and the system-under-test. CaGe makes use of it in following scenarios:
- Generated Documentation
-
The sequence diagrams can be found in the generated CaGe documentation. It shows the "expected" behavior of test and SUT.
- Test Execution
-
The CaGe sequences and (re)actions are recorded at runtime, see Runtime Test Recording. This is put together into a sequence diagram, which shows the "actual" behavior of the test and SUT.
- Eclipse Editor
-
The PlantUML View can be placed along side of the editor. It will show the diagram for the currently selected sequence. The view can be activated from the menu bar in Windows→Show View→Other and then "PlantUML".
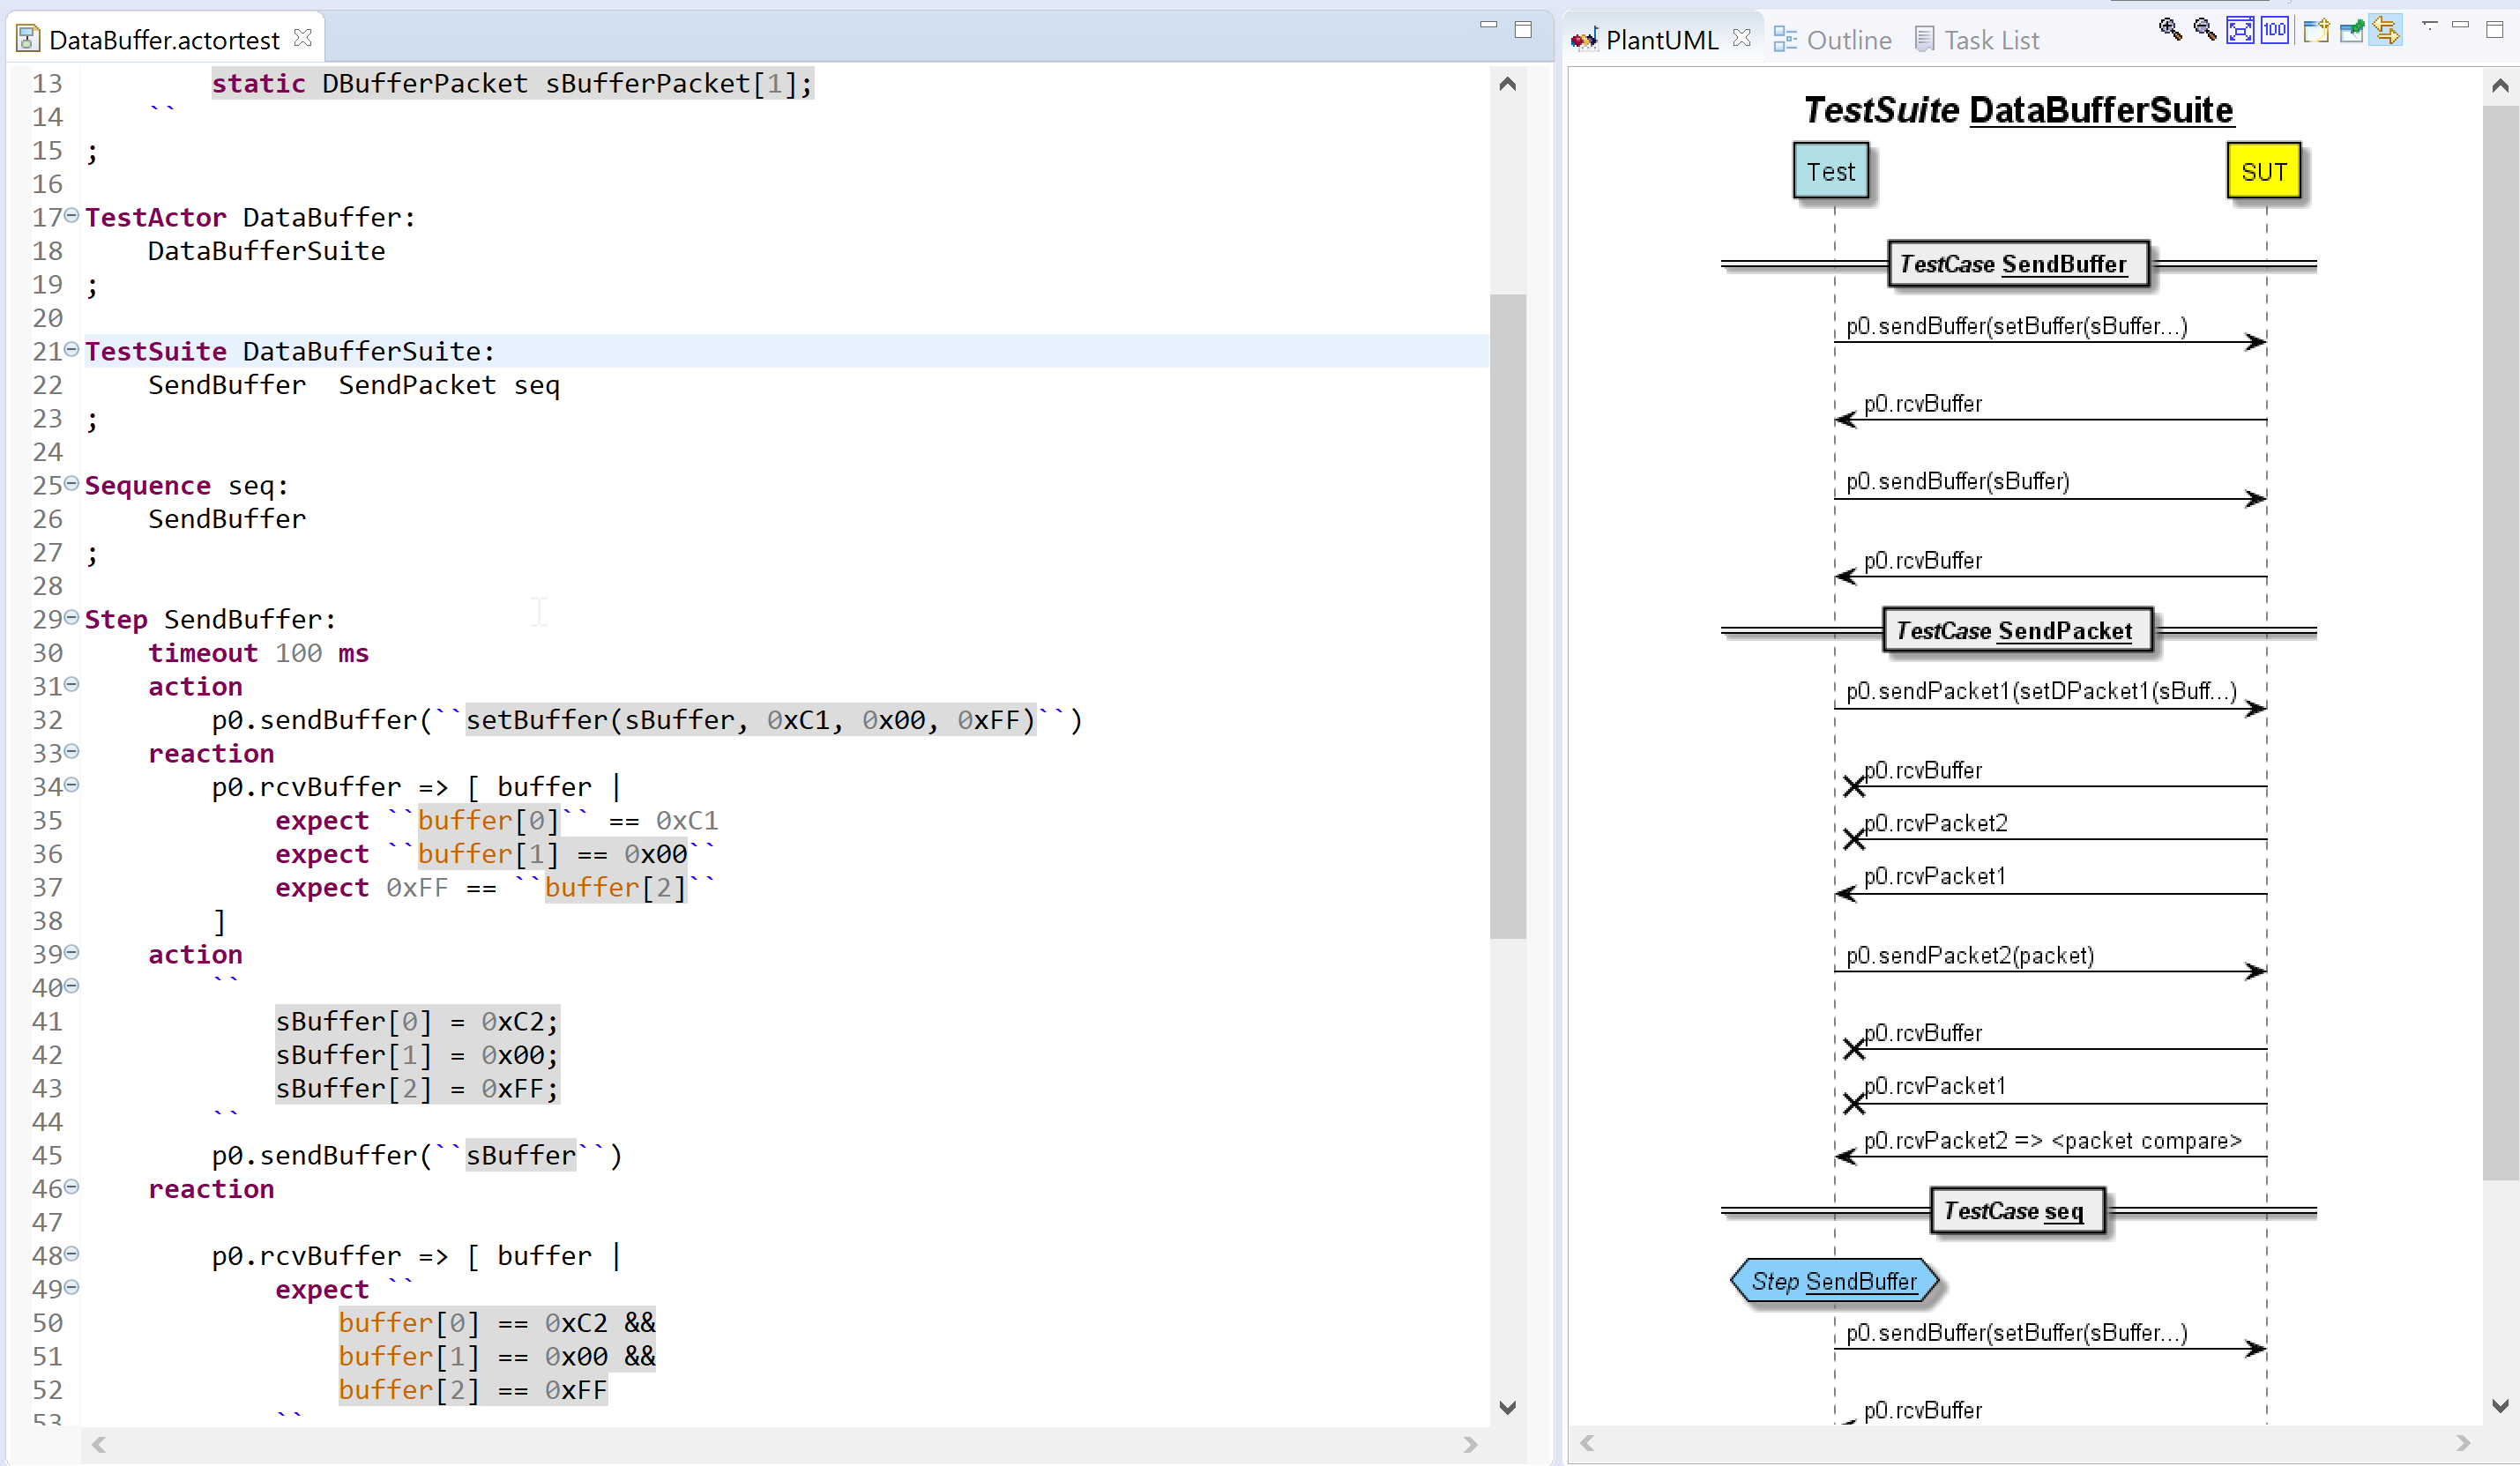
Runtime Test Recording
The test sequences can be recorded during runtime for test reporting or debugging. After test execution, they can be viewed graphically as PlantUML Sequence Diagram. By that, the expected test behavior and the actual behavior can be compared easily.
Below is a simple example, which demostrates the workflow of the test recording. First, when defining a test, the diagram for the expected behavior can be seen in Eclipse or the generated documentation.
| Textual Test Definition | Diagram Expected Test |
|---|---|
|

|
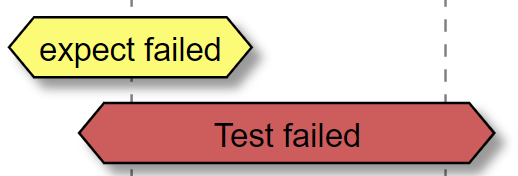
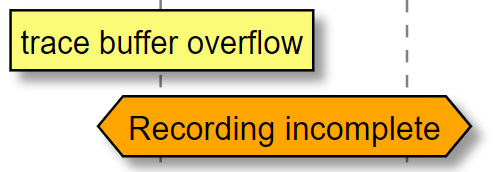
After test execution, the recorded sequences can be compared with the expected behavior. Below are two recorded test runs, the first failed due a timeout from the missing message and the second one is passing.
| Expected Test | Actual Test Run #1 | Actual Test Run #2 |
|---|---|---|
|
|

|

|
| On how to obtain the recorded traces in practice, please refer to the the manual of the product, which integrates CaGe . |
| Diagram | Description |
|---|---|
|
The test failed due a timeout, probably causesd by missing message(s). |
|
The failed due an unfulfilled expect statement. The reason and more details can usually be found in the Text Logging. |
|
The recording is incomplete, which can be caused by resource or performance limitations. This must be adjusted in the product, which integrates CaGe. |
|
This message was received but discarded. The message might not be mentioned in the current Step or has been received too early, see Action and Reaction. |


Deep C/C++ Integration (experimental)
CaGe provides a deep C/C++ integration based on Eclipse CDT, the official C/C++ development tooling of Eclipse. The integration is available for targetcode that is embedded inside CaGe, see Using C Code The syntax validation is activated by default and is working out of the box. Deeper integration like the resolution of functions and includes or navigation to C/C++ files require advancded code analysis. For this, the user has to configure the CDT Indexer, see Setting Up Include Paths.
Following features are available:
| Feature | Activated | Configuration of CDT | Description |
|---|---|---|---|
Syntax Validation |
default |
None |
Checks for C/C++ syntax errors like a missing semicolon. The validation is triggered on file save. |
Syntax and Index Validation |
manually (see below) |
Include Paths |
Additionally checks for unresolved function, symbols, types and includes. The include paths have to be accurate to avoid wrong warnings. |
Jump to Declaration kbd:[F3] |
default |
Include Paths |
Opens the declaration of given function or symbol in C/C++ editor. |
| This is an experimental feature based on a third-party tool. It is recommended to learn about the CDT Indexer and Setting Up Include Paths. |
The C/C++ integration can be switched off with the option statement enableCDTIntegration = false.
The validation can be control with the option statement targetCodeValidation = 'syntax|index|disabled', where syntax is the default. index enables the symbol resolution based on the CDT Indexer. The validation is triggered on file save.
options:
	enableCDTIntegration = true
	targetCodeValidation = 'syntax' // 'index', 'disabled' (triggered on file save)
;
Retry Unstable Tests
If a test is annotated with @UnstableTest(maxRetries), CaGe will automatically rerun the test case after failure.
This can be useful for tests, that are failing sporadically and cannot be fixed immediately.
The test run finishes when the test is successful or is exceeding the given amount of maxRetries.
In total, the test is executed at most 1 + maxRetries.
The annotation has only effect for a test case, which is a Step or Sequence called from a TestSuite.
import etrice.api.annotations.UnstableTest

TestSuite TimingTestSuite:
    TimingTest
;

@UnstableTest(maxRetries=1)
TestCase /*Step or Sequence*/ TimingTest:
    // TODO test is failing sporadically
;
The retry of the test is shown in the textual log and in the test trace.
| Text Log | Trace |
|---|---|
[ RUN ] TestCase TimingTest TIMEOUT expired! [ RETRY ] TestCase TimingTest unstable [ OK ] TestCase TimingTest |
|

Language Reference
TestModel
A TestModel defines tests in form of steps and sequences for a system under test. First a test interface consisting of ROOM ports has to be defined. For this, the interface rules allows to re-use an existing ports of an ActorClass.
There are two main test components: Steps define pairs of action and reaction, where as Sequences compose steps or nested sequences. Both, steps and sequences, can be called in a TestSuite. These calls are treated as test cases.
TestModel NAME

interface:
	ActorClass PortProvider
;

targetcode ``
	// c code, e.g. includes, defines or static helpers functions
``

TestActor NAME:
	// generates an eTrice ActorClass to instantiate and execute given tests
	// ... call TestSuites here
;

TestSuite NAME:
	// ... call Steps or Sequences here (test cases)
;

Sequence NAME:
	// call other sequences or steps here

Step NAME:
	// pairs of action and reaction
;
import
Enables reference to existing elements in other models. Import consists of name(space) and file path. Use content assist.
// import single element
import namespace.name
// import namespace
import namespace.*
interface
Definition of the test interface, which is available in Steps.
interface:
	ActorClass AActorName
;
ActorClass
Reference to an existing eTrice ActorClass to derive the test interface. The given ActorClass ("port provider") defines the test interface. The ports of this ActorClass are available in Steps to send or expect messages. Further the generated ActorClass to execute tests will contain a copy of these ports.
interface:
	ActorClass APortProvider
;
If inverted is used, then the 'conjugated' status of the ports will be toggled. This options can be used to automatically derive the test interface, when writing tests for exactly one component.
interface:
	inverted ActorClass SystemUnderTest
;
inverted
Toggles the port from 'regular' to 'conjugated' and vice-versa. If inverted is used, then the 'conjugated' status of the ports will be toggled. This options can be used to automatically derive the test interface, when writing tests for exactly one component.
interface:
	inverted ActorClass SystemUnderTest
;
options
Options to configure the generated test. Set options that affect the generation. Additionally there are options that take place during runtime, see below.
enableCDTIntegration switch to dis/enable CDT integration including targetCodeValidation. CDT integration is an experimental feature.
targetCodeValidation controls the validation of target c code based on CDT. Default is syntax only, but it also possible to validate based on CDT index to resolve symbols.
useControlService activates an additional service (SAP with protocol room.basic.testselect.PSelectableTest) to control the test execution, e.g. tests can be started selectively.
options:
	// dis/enable experimental CDT integration
	enableCDTIntegration = true
	// set level of target cod validation
	targetCodeValidation = 'syntax' // 'index', 'disabled' (triggered on file save)
	// activates test service - requires implementation of service `PSelectableTest`
	useControlService = true
;
The runtime options that be set using the header file CaGeOptions.h.
stopTestingOnFail controls the behavior after failure or timeout. If true, no other test case will be executed. This can be useful for debugging. By default the test execution continues with next test case. traceMode controls the plantuml trace output. If activated, the trace is written out after a test case has failed or finished.
targetcode
Target code that is generated to the test file.
targetcode ``
	#include "someHeader.h"
	#define MY_DEFINE 500
``
TestActor
Creates an eTrice ActorClass to instantiate and execute CaGe tests. This rule is necessary to create executable tests. It generates an eTrice ActorClass with same name, which can be instantiated in any ActorClass or SubsystemClass via an ActorRef. The ActorClass contains all port that are used in the given TestSuites.
TestActor NAME:
	TestSuite1
	TestSuite2
	// ....
;
In order to instantiate the generated ActorClass in a .room file, the CaGe model has to be imported:
import TestModel_name.* from "cage_file.room"

ActorClass MyActor {
	Structure {
		ActorRef cageTests : NAME
	}
}
TestSuite
Defines test cases. A TestSuite is a container for steps and sequences, which will act as test cases. Upon failure at any point, the current test case is cancelled and the next is started.
TestSuite NAME:
	TestCase1
	TestCase2
	TestCase3(5, true) // with parameters if available
;
// generated test cases from state transition graph
TestSuite:
	generate GRAPH n-switch = 0
;
Step
Defines a list of action and reaction blocks. The blocks itself are treated in sequential order. The behavior of the blocks are described in action and reaction. The expiration of the optional timeout is failure. Every step should own or inherit a timeout to guarantee termination.
/* Documentation */
Step NAME:
	timeout 100ms
	action
		port.message(data)
		wait 50 ms
	reaction
		port.message(data)
	fail
		// custom failure handling
;
A step optionally takes parameter(s).
Step NAME(int param1, bool param2):
	action
		port.message(param1)
	reaction
		port.message(param2)
;
Sequence
Composes steps or other sequences. The timeout is optional and inherited to all test elements.
Sequence NAME:
	timeout 100ms
	Step1 Step2 Sequence3
	Step4(5, true) // with parameters if available
	``doSomething();`` // target code
;
A sequence optionally takes parameter(s).
Sequence NAME(int param1, bool param2):
	StepWithParams(param1, param2)
;
action
Block of expressions that models test input or stimuli to the system-under-test. Defines a set of sequential actions, e.g. sending messages.
action
	port.message1       // message without data
	port.message2(true) // boolean value
	port.message3(1)    // number value
	port.message3(``expression``) // target code
	``free target code``
	wait 50 ms
reaction
Block of expressions that model the expected output or reaction of the sut. Defines a set of messages that should occur in any order. To expect messages in explicit order, chain several reaction blocks together. Reaction statements can be formulated using the expect expression.
reaction
	expect port.message1		// message without data
	expect port.message2 > x	// message with data compare
reaction
	// temporal modifiers
	expect next port.message	// see next. next is the default modifier. The keyword may be omitted, see examples above
	expect finally port.message	// see finally
	expect absent port.message 	// see absent
Examples:
	expect port.message == true          // boolean value
	expect port.message != 0x1           // number value
	expect port.message in range[0..1]   // number interval expression
	expect port.message in set{0, 1, 4}  // set expression
	expect port.message == ``expression`` // target code
	expect port.message == *			 // ignore value

	// binds message data to 'msgData' for complex compares inside block
	expect port.message => [ msgData |
		expect msgData == 5
		expect msgData == ``FIVE``
		expect ``msgData[1]`` == 5
		expect ``msgData[1] == FIVE``
	]
fail
Fails the current tests. This statement causes the current test to fail. It is available in Steps and Sequences.
Sequence test(int param)
	if ``param == 5``
		fail reason "I don't like this parameter value"
	endif
expect
Test expression that compares values similar to other unit frameworks. Allowed in reaction blocks. Can be used to expect a message with temporal modifier next (default), finally and absent. Within a message expect, it can be used to compare the received data.
reaction
	// fails immediately if the next message (of this type) does not match
	expect next port.message == 5
reaction
	// wait until matching message is received or timeout
	expect finally port.message == 5
reaction
	// don't receive this message
	expect absent port.message
	// requires another message expect
reaction
	// optional reason that is printed on fail
	expect port.message reason "my fail message"
Examples data compare:
	expect port.message == true          // boolean value
	expect port.message != 0x1           // number value
	expect port.message in range[0..1]   // number interval expression
	expect port.message in set{0, 1, 4}  // set expression
	expect port.message == ``expression`` // target code
	expect port.message == *			 // ignore value

	// binds message data to 'msgData' for complex compares inside block
	expect port.message => [ msgData |
		expect msgData == 5
		expect msgData == ``FIVE``
		expect ``msgData[1]`` == 5
		expect ``msgData[1] == FIVE``
	]
absent
Temporal modifier for expect message. Fails if given message is received. Allowed in reaction blocks as a modifier for expect message. Expect absent must be combined with at least on additional message expect. This second message defines the time window to check for absence. Otherwise the test execution would immediately continue with the next block.
reaction
	expect absent port.badMessage  // fail if received
	expect next port.okMessage   // wait for message
next
Temporal modifier for expect message. Fails immediately if the next message (of this type) does not match. Allowed in reaction blocks as a modifier for expect message. next is a temporal operator of Linear temporal logic.
reaction
	expect next port.message == 5
finally
Temporal modifier for expect message. Waits until matching message is received. Allowed in reaction blocks as a modifier for expect message. Expect finally waits until the message with the expected data is matched. The expect can only fail when a timeout occurs. finally is a temporal operator of Linear temporal logic.
reaction
	expect finally port.message == 5
	expect finally port.message == 7
range
Represents a number interval between the given minimum and maximum (inclusive or exclusive).
Allowed in test expressions to compare values.
Equals to x >= min && x =< max.
reaction
	expect port.message in inRange[-5..5]
Possible variants:
	range[-5..5]	// inclusive
	range(-5..5)	// exclusive
	range[*..0]	// infinite min
	range(0..*)	// infinite max
set
Represents a list of values for test expressions.
Allowed in test expressions to compare values.
Equals to x == element1 || x == element2 ….
reaction
	expect port.message in set{1, 2, 3}
timeout
Sets a timeout to the current test element. Expiration is failure.
timeout 100 ms
timeout parameter ms
timeout ``RESET_TIMEOUT`` ms
wait
Wait the given amount of time. All messages during wait are discarded. Non-blocking execution. Available in Step action and Sequence.
	wait 100 ms
	wait parameter ms
	wait ``RESET_TIMEOUT`` ms
for
Loop expression in Sequences and Step. For-loop expression to send/expect message or call sequences several times.
action
	for i in range[0..3]
		port.message(i)
	endfor
if
If/else expression in Sequences and Step. If/else expression to conditionally send/expect message or call sequences.
action
	if ``condition``
		port.message1
	else
		port.message1
	endif
else
If/else expression in Sequences and Step. If/else expression to conditionally execute send/expect message or call sequences.
action
	if ``condition``
		port.message1
	else
		port.message1
	endif
reason
Custom failure message for expect. Can be put after any expect to output a custom failure message. It can be text or target code, which provides a string. Does not apply to timeout.
reaction
	expect port.pong == 2 reason "Expected two but got something else"
	expect port.pong => [ data |
		expect data == 2 reason ``string_var_or_function(data)``
	]
skip
Skips the current test early. This statement quits the current test case immediately and marks it as "skipped" in the results. In contrast, fail will quit the current test with an failure.
Sequence testcase:
	skip reason "to be implemented"
//  fail reason "to be implemented"
;
StateTransitionGraph
An alternative way of writing tests which allows the generation of combinatorial test cases A state transition graph models abstract test paths using state and transition. The transitions are referencing step and sequences to provide the test logic. From this description, the test cases are derived automatically. Each test case is a test path in the graph selected by the generation method.
StateTransitionGraph Name:
	State initial:
		=> idle [ /* call steps or sequences */]
	;
	State idle
;
State
State in a state transition graph A state with transition represent a junction in the test graph.
State idle:
	=> onState [ switchOnStep() ]
	=> errorState [ simulateErrorStep() ]
	=> nextState
;