Project Structure
Overview
The miniHIL application consists of several projects. The listing below shows the typical folder structure. The folders marked with * are Eclipse projects and participate in the build of the miniHIL application. The MiniHilProject assembles the executable, whereas the other projects are libraries.
Project Root
├── CubeProject*
├── Documentation
├── DUTProject
├── HilSimGUI*
├── MiniHilProject*
└── Ozone
.
└── minihillib
    ├── SimModelLib*
    └── SimRuntime*
|

Figure 1. Dependency Graph
|
User-defined Files
By default, in the miniHIL template project, the MiniHilProject/model-user sub-folder is configured as the root folder for all user-provided eTrice models and all CaGe test models. This folder is also the location for all other generator inputs if applicable, e.g. the bus adapter generators.
The MiniHilProject/src-user sub-folder is the default source folder in the miniHIL template project for user-provided C/C++ source and header files.
The MiniHilProject/model-user and MiniHilProject/src-user folders will be scanned recursively for model and source files, respectively.
Project Artifacts
There are two types of generated artifacts that are output by the miniHIL project: artifacts generated at build time and artifacts that are generated at runtime. Build time artifacts include things like documentation and executable binaries. Runtime artifacts include outputs such as test results, logs and traces.
Build artifacts
Build artifacts are found in the MiniHilProject/build folder as well as the MiniHilProject/src-gen and MiniHilProject/model-gen folders:
Project Root
└── MiniHilProject
    └── build
        ├── cagedoc-gen
        ├── cagedoc-html
        ├── objs
        └── tmp
    .
    ├── model-gen
    └── src-gen
The executable binary of the MiniHilProject and related compiler output are found directly in this folder. Object files are managed by the miniHIL gradle build in the objs sub-folder. The tmp sub-folder contains toolchain logs for troubleshooting build issues. Generated documentation and "expected" sequence diagrams for the CaGe tests will be placed in the cagedoc-html sub-folder. The cagedoc-gen sub-folder will contain intermediate Asciidoctor, Graphviz, and PlantUML files used to create the test case documentation in cagedoc-html. Test case documentation is generated either by running the generateDocumentation launch configuration in the IDE, or by running the cageDoc gradle task from the headless build.
MiniHilProject\src-gen contains the generated C source code from all eTrice and CaGe models in the project. MiniHilProject\model-gen contains any intermediate eTrice models, if applicable, for generator inputs (excluding eTrice or CaGe).
Runtime artifacts
Runtime artifacts are located generally in two different locations, depending on whether the HilSimGUI or the headless build is being used.
Project Root
└── HilSimGUI
    ├── cageTraces
    ├── etTraces
    ├── testcases
    └── log.txt
.
└── MiniHilProject
    └── build
        ├── cageTraces
        ├── etTraces
        └── tests
In the case of the headless build, the runtime artifacts will be placed in the MiniHilProject/build folder. CaGe test sequence traces will be found in the cageTraces sub-folder. eTrice message sequence diagrams are generated in the etTraces sub-folder. Test output, eTrice application log output, feature coverage reports, and collected runtime statistics will be placed in the tests sub-folder.
When working with the HilSimGUI, the runtime artifacts will be located in the HilSimGUI folder. CaGe test sequence traces and eTrice message sequence diagrams will again be found in cageTraces and etTraces sub-folders, respectively. Test output is found in the testcases sub-folder. And the eTrice application log output is contained in the HilSimGUI/log.txt file.
Customizing the MiniHilProject Build Configuration 
The build configuration of the MiniHilProject can be customized as follows.
Compiler and linker flags
The items in the Gradle extra property userCompilerFlags will be appended to the default compiler flags. Similarly, the items in the userLinkerFlags extra property will be appended to the default linker flags. Both properties are specified as a comma-delimited array of strings.
ext.userCompilerFlags   = [ '-g3', '-O0', '-Wall' ]
ext.userLinkerFlags = [ ... ]  |
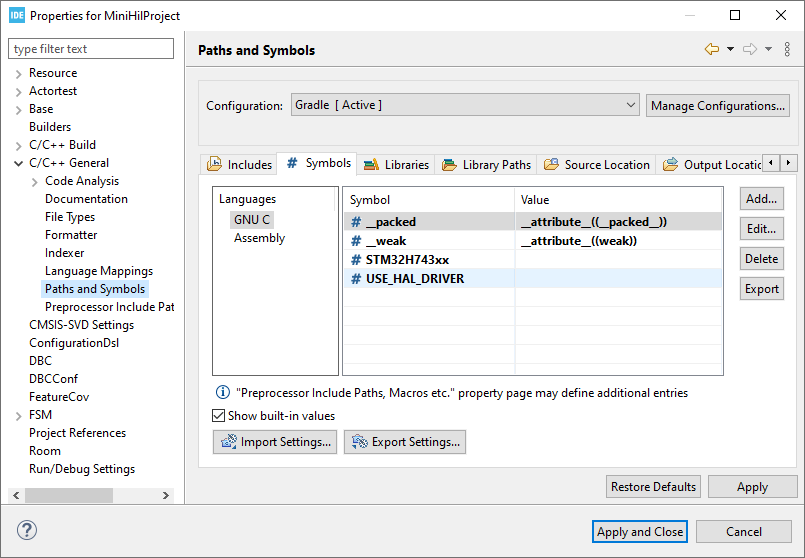
For flags such as preprocessor defines that may impact the code indexer in the IDE, it may be necessary to update the CDT build settings with the matching flag. In the Project Explorer of the IDE, right-click on MiniHilProject and select "Properties". Navigate to the "C/C++ General" → "Paths and Symbols" properties page. New entries can be added to the lists within the "Includes" and "Symbols" tabs. |
Additional source directories
If the MiniHilProject application requires additional source files, they can be included using the userSourceDirs extra property. The property is specified as a comma-delimited array of strings. The build will include all source files recursively within each source directory, to be compiled and linked as part of the MiniHilProject application binary.
| |
Only directories are valid values for the userSourceDirs property. Directories paths are considered relative to the MiniHilProject project folder. |
For example, the directory located at:
Project Root
└── MiniHilProject
    └── src-custom
corresponds to the following configuration:
ext.userSourceDirs = [ 'src-custom', ... ]Include paths
By default, all source directories will be added to the compiler include paths.
Additional include paths can be specified directly with compiler flags using the userCompilerFlags extra property:
ext.userCompilerFlags   = [ ...,
	'-I', file('inc-custom').absolutePath,
	... ]
The file() property is a built-in property of the Gradle Project API. It is used here to create a Java File object relative to the MiniHilProject directory. From this File object the corresponding absolute path can be obtained.
Note that, similar to preprocessor define flags, it may be necessary to update the IDE project build settings for the indexer to find the headers in the custom include directory.
Create new Model Library
The following shows how to create a new model library, which can be used to share common sources/models between multiple miniHIL projects.
Steps:
-
❏ Create new library project based on template
-
❏ Verify build
-
❏ Import library project in Eclipse
-
❏ Add to miniHIL build
Create new library project based on template
In the minihillib folder is a template for a new library project.
-
Extract
minihillib/LibraryTemplate.zipand move it to root of the miniHIL project (git root) -
Rename the folder
LibraryTemplateto the new library name -
Rename the Eclipse project to the new library name: This has to be done in the Eclipse project file
LibraryTemplate/.projectat line 3.
| |
See Customize Project Paths to place projects at arbitrary locations |
Verify Build
Go to the project root (git root) and execute .\gradlew.bat projects . The output should contain the new project:
> Task :projects ------------------------------------------------------------ Root project ------------------------------------------------------------ Root project 'MiniHilProject_Template' +--- Project ':CubeProject' +--- Project ':HilSimGUI' +--- Project ':LibraryTemplate'+--- Project ':miniHilLib' | +--- Project ':miniHilLib:SimModelLib' | \--- Project ':miniHilLib:SimRuntime' \--- Project ':MiniHilProject' To see a list of the tasks of a project, run gradlew <project-path>:tasks For example, try running gradlew :CubeProject:tasks BUILD SUCCESSFUL in 0s 1 actionable task: 1 executed
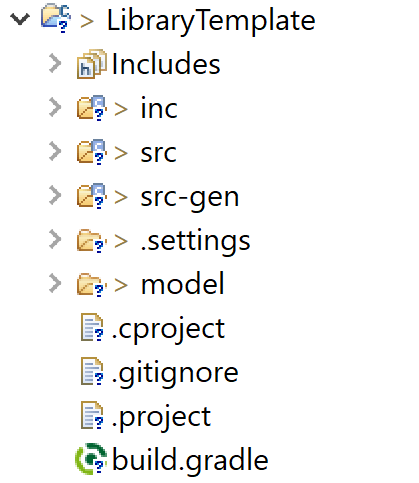
Import library project in Eclipse
Import the new library in Eclipse. The resulting Eclipse project should look like this:
Add library to MiniHilProject
Go to the build file of the executable MiniHilProject at MiniHilProject/build.gradle and add a new entry in userLibraries:
/**
 * This project assembles the miniHIL executable.
 */

ext.userSourceDirs      = [ 'src-user' ]
ext.userCompilerFlags   = [ '-g3', '-O0', '-Wall' ]
ext.userLinkerFlags     = [ ]
ext.userLibraries       = [
	[ project: ':LibraryTemplate', library: 'LibraryTemplate' ]
]

// apply defaults
apply from: new File(miniHilLibGradleDir, 'MiniHilProject.gradle')
At last, add the new library project to the modelpath:
srcDir model-user
project SimModelLib
project LibraryTemplate 
Now the new model library is part of the miniHIL project setup. Any header file in folder inc can be included from the MiniHilProject. Also the model elements in folder model can be used in the MiniHilProject.
Integrate external C Library
The following shows how to integrate an external pre-built C library, which usually consists of header files and a binary file.
An external library can be integrated
-
in the executable MiniHilProject
-
in a model library project

Integrate in executable MiniHilProject
First the external library has to be declared, see callouts <1> to <3>. Afterwards the library has to be added to the userLibraries at <4>.
/**
* This project assembles the miniHIL executable.
*/
apply plugin: 'c'
model {
repositories {
libs(PrebuiltLibraries) {
myExtLib {
headers.srcDirs = [ 'path/to/include' ]
binaries.withType(StaticLibraryBinary) {
staticLibraryFile = file('path/to/staticLibrary.lib')  }
}
}
}
}
ext.userSourceDirs = [ 'src-user' ]
ext.userCompilerFlags = [ '-g3', '-O0', '-Wall' ]
ext.userLinkerFlags = [ ]
ext.userLibraries = [
[ library: 'myExtLib' ]
}
}
}
}
}
ext.userSourceDirs = [ 'src-user' ]
ext.userCompilerFlags = [ '-g3', '-O0', '-Wall' ]
ext.userLinkerFlags = [ ]
ext.userLibraries = [
[ library: 'myExtLib' ]  ]
// apply defaults
apply from: new File(miniHilLibGradleDir, 'MiniHilProject.gradle')
]
// apply defaults
apply from: new File(miniHilLibGradleDir, 'MiniHilProject.gradle') |
Symbolic Name of the library |
|
Include search paths passed to compiler (comma separated) |
|
Binary file passed to linker |
|
userLibrary entry |
As a result, the library should be accessible from the MiniHilProject.
Integrate in model library project
First the external library has to be added to the library project, see Integrate in executable MiniHilProject .
/**
 * This project builds a minihil library.
 */

apply plugin: 'c'

model {
	repositories {
		libs(PrebuiltLibraries) {
			myExtLib {
				headers.srcDirs = [ 'path/to/include' ]
				binaries.withType(StaticLibraryBinary) {
					staticLibraryFile = file('path/to/staticLibrary.lib')
				}
			}
		}
	}
}

ext.userIncludeDirs		= [ 'inc' ]
ext.userSourceDirs		= [ 'src' ]
ext.userCompilerFlags 	= [ '-g3', '-O0', '-Wall' ]
ext.userLibraries		= [
	[ library: 'myExtLib' ]
]

// apply defaults
apply from: new File(miniHilLibGradleDir, 'MiniHilLibrary.gradle')
In addition, the external library has to be added to the executable MiniHilProject. The order of the userLibraries is important for the linker.
ext.userLibraries		= [
	[ project: ':LibraryTemplate', library: 'LibraryTemplate' ],
	[ project: ':LibraryTemplate', library: 'myExtLib' ]
]
As a result, the library should be accessible from the model library and all dependent projects.
Customize Project Paths
By default, all projects in the root level of the miniHIL project (git root) are automatically included. This is configured in the .settings.gradle file. Additional projects can be added to the build via the include statement.
include ':MyLibraryProject'
project(':MyLibraryProject').projectDir = file('path/to/MyLibraryProject')
See Verify Build to inspect the resulting project setup.