Running miniHIL applications on PC
By allowing miniHIL applications to run on PC, it is possible to leverage the same test tooling, automation and reporting provided by CaGe, eTrice, and the miniHIL build infrastructure, while increasing flexibility for additional scenarios, such as interfacing with hardware via PC drivers and taking advantage of multi-threaded execution.
There are several differences compared to normal miniHIL development. Primarily:
-
Full control over eTrice ROOM physical model and thread mapping
-
No interface to simulator hardware (see the section below, Referencing Models from SimModelLib)
-
GUI and headless connection via TCP instead of USB
Prerequisites
A GCC toolchain, for example MinGW, must be installed first before a PC-based miniHIL application can be built.
 |
The GCC toolchain binaries must be made available from the system path in order for the miniHIL toolchain to find it. |
Template Project
A PC-based template project is provided as part of the miniHIL release. It can be found in the MiniHilProject_Template_cube_pc.zip file which contains the miniHIL library, default Gradle build, and a skeleton application project. This template can be used as a starting point for developing an application to be run on the PC.
Workspace setup for the PC cube template project is similar to the normal cube template project. In a new miniHIL IDE workspace, simply import all existing projects from the root directory of the extracted PC template zip file.
Running the application
To execute the application from the IDE, select the MiniHilProject launch configuration or click on either the Run or Debug buttons. The application will be built automatically if necessary. Upon initialization, the application will start a TCP server for remote connections.
Connecting with the HilSimGUI
The GUI can be started by double-clicking runGUI.bat in the HilSimGUI project. Once the GUI is started, click on the "Connect" button in the toolbar to connect to the running application. From the GUI it is possible to select and run CaGe tests, view the console output, and toggle tracing on and off. Reports are generated in the /HilSimGUI project folder.
Connecting via Gradle
To run the tests in headless mode, either run the External Tools launch configuration "runTests" in the miniHIL IDE, or execute the command:
./gradlew.bat runTests
The gradle build will attempt to connect to the application and run all CaGe tests. Reports are generated in the Gradle build folder located at /MiniHilProject/build. Refer to the section Running Tests for more details.
Configuration
The PC variant of the miniHIL build is enabled if the gradle.properties file located in the miniHIL PC template root folder contains the property:
variant=pc
If connecting to the running application via the Gradle build, then the address property used by the runTests task should also be set to the correct URI. For example:
address=tcp://127.0.0.1:1234
PC-Based MiniHilProject
As with the normal non-PC case, the MiniHilProject contains the user-implemented part of the application. This is where CaGe tests and integration code can be implemented. The MiniHilProject/gradle.build script can be used to customize how the application is built — for example adding additional source directories or specifying compiler and linker flags. Custom user model libraries also work the same as in the non-PC case. Refer to the sections on MiniHilProject build customization and user model libraries for more information.
Directory structure
-
/MiniHilProject: Application project root (Generic CDT Project) and application build script
-
/model-user: Location of user-developed application models
-
/src-user: Optional location for user-provided C/C++ files (create if needed)
-
/launchConfigs: Default launch configurations for the miniHIL IDE workspace
-
Launch configurations
The following launch configurations are predefined:
| Name | Type | Gradle Task | Description |
|---|---|---|---|
MiniHil Executable |
Run/Debug |
assemble |
Execute the project executable, performing an incremental build first |
cleanAll |
External Tool |
clean |
Delete all build artifacts |
generateDocumentation |
External Tool |
cageDoc |
Generate the Asciidoctor and HTML documentation for the cage test suites |
runTests |
External Tool |
runTests |
Invoke the cage tests and generate test results and traces (note: this will try to connect to a running project executable, so first run or debug MiniHil Executable). |
For further details about how these launch configurations work, refer to the description of build integration in the IDE.
Model structure
CaGe and eTrice models can be integrated within the MiniHilProject.Application container actor found in MiniHilProject.room. The default services available to the Application container are shown in the structure diagram for the MainSubSystem below:
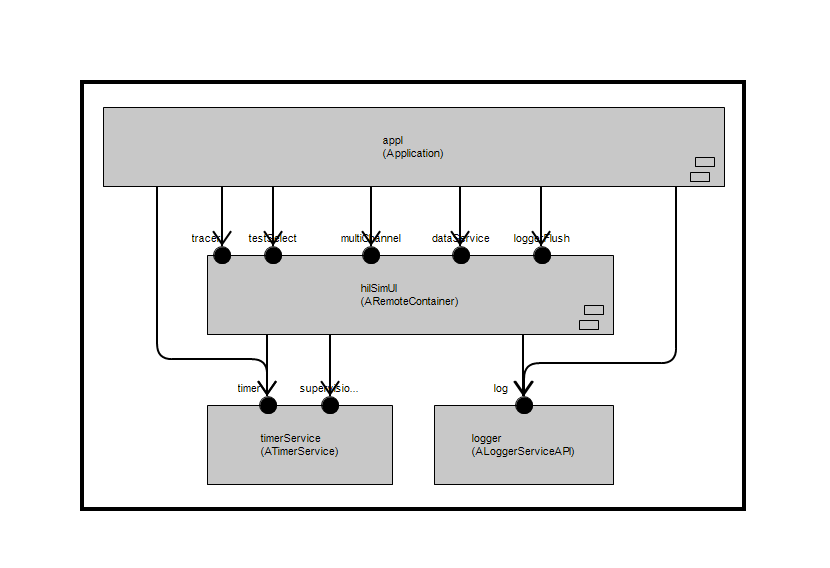
The ARemoteContainer instance provides remote miniHIL services to the application. This ActorClass is also responsible for managing the interaction with the miniHIL GUI and the headless gradle build, and it contains the TCP listener for the remote connection.
Physical Model
The default eTrice physical model included in the PC-based template project contains a single thread that supports both event-driven and polled execution. The properties of this thread, for example execution mode, priority, polling interval, and message service parameters, can be configured in the model-user/MiniHilProjectPc.etphys file. Additional threads can also be defined in this file and then mapped to the eTrice ROOM model in the model-user/MiniHilProjectPc.etmap file. Please refer to the eTrice user documentation for further details.
Referencing Models from SimModelLib
In general, ROOM models within the api namespaces can be used in a PC-based miniHIL application, except when the ROOM model is also contained in an adapter namespace. Typically the adapter ActorClasses reference hardware-specific elements which will not be available in a PC environment.