Headless Build and Test
Gradle
The miniHIL toolchain uses Gradle, an open-source build automation tool. The support of C/C++ is referred to as native software plugins. The official documentation can be found here.
Usage
Executing Gradle on the command-line is based on the wrapper script gradlew.bat, which is located in the root folder of the miniHIL projects (build root). The script accepts a list of task names.
.\gradlew.bat [taskName...]
For example, the command-line call for building the miniHIL executable is
.\gradlew.bat assemble
Most build artifacts can be found in the build folder of each subproject, e.g. the resulting .elf is located in MiniHilProject/build/
The build is made up of one or more tasks, which trigger an action like compiling or flashing. Several tasks can be specified in the command-line call. The tasks are ordered automatically, e.g. compile before flash.
Several tasks can have arguments, which are passed as gradle property. They are prefixed with -P followed by the property assignment propertyName=value.
.\gradlew.bat [taskName...] [-PpropertyName=value...]
Basic miniHIL Tasks
The following table depicts common tasks of the miniHIL toolchain.
| Task Name | Description |
|---|---|
|
compiles and links library or executable |
|
cleans all build artifacts, e.g. tmp folder and generated sources |
|
creates the .html documentation of CaGe tests |
|
flashes executable and hard resets simulator MCU using given utility |
|
hard resets simulator MCU using given utility |
|
checks the simulator connection and if a simulator with specific features is connected |
|
connects to simulator and runs a full-stack heartbeat |
|
runs CaGe tests on simulator, see Running Tests |
|
outputs all available test names, that can be optionally passed to |
|
start the Hil Simulator GUI |
 |
task* has configuration |
Running Tests
The task runTests connects to the simulator and runs the available CaGe tests.
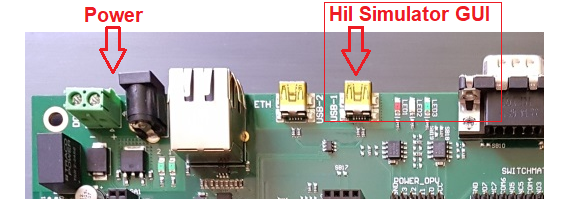
It automatically connects to USB1.Please make sure that miniHIL application is running and the COM-Port is not blocked by another software.
The following command will run a full test including build, flash and test execution.
.\gradlew.bat assemble flash runTests
The task will output the text logging on console. In addition all outputs are written to files in MiniHilProject/build/tests. Also the jUnit/xUnit report (.xml) is created in this folder, which can be used for test result reporting on most continuous integration solutions.
Selecting Tests
The property tests allows to select the executed tests. This can be a list of test names separated by ;. The test name can be a test suite or a single test case.
.\gradlew.bat runTests "-Ptests=TestName1;TestName2"
You can use the task showTests to see all available test names.
.\gradlew.bat showTests

TemplateTestSuite
TemplateTestSuite.TemplateTestCase
TemplateTestSuite.TestCaseWithArguments(1, true)
The command outputs all test names in a unique format. To this end, the test case are prefixed with the containing test suite. Further, test cases with parameters are identified with the concrete values.
Test suites are executed in the order in which they appear in the selected tests list or otherwise as listed in shownTest. Test cases belonging to the same test suite are always executed together and in the order as they appear in the test suite, no matter where they appear in the selected tests list.
To simplify the test selection, you can either use the simple test case name or use the wildcard * character. This will select all matching test names.
.\gradlew.bat runTests "-Ptests=TemplateTestCase;TestCaseWith*"
Select Tests from File
Alternatively the test names can be passed as a file using the property testFile. The naming schema is the same as above, but separated with a new line. Again, use the task showTests to see all available test names.
.\gradlew.bat assemble flash runTests "-PtestFile=path/to/file"
| Property | Description |
|---|---|
|
|
List of tests to execute separated by |
|
|
File with tests to execute separated by line |
|
|
Manual address of miniHIL. [miniHILAddress] can either be a COM Port Examples: .\gradlew.bat runTests "-Paddress=COMX" .\gradlew.bat runTests "-Paddress=usb://miniHIL:0x000000000" |
Automated Build and Test on Server
In case of a server-side build, the gradle daemon should be deactivated by providing the --no-daemon option.
Example command line call for build-only:
.\gradlew.bat --no-daemon build
Example command line call for test execution.
.\gradlew.bat --no-daemon build flash runTests "-Paddress=usb://miniHIL:0x000000000"
See Running Tests for test result reporting.
Checking for specific hardware
The preCheckConnection task can be used to check if a specific miniHIL or a miniHIL with specific hardware setup is connected before any other task which uses the hardware is performed.
Checking for a specific miniHIL
The preCheckConnection task can be used in combination with the mcuID parameter. If the mcuID parameter is set the task will fail if a board with a different mcuID is connected.
.\gradlew.bat preCheckConnection -PmcuID="0xDEA123"
Checking for a specific hardware setup
The preCheckConnection task can be used in combination with the testHW parameter. If the testHW parameter is set the task will fail if a board with a different testHW is connected.
The testHW String of a miniHilBoard is set using an ndef record which has to be written to the NFC chip of the miniHil board. The ndef record must be of type text and must contain a text with the following structure: TstHW:Demo1. Here "Demo1" can be replaced by an arbitrary string shorter than 30 characters.
.\gradlew.bat preCheckConnection -PtestHW="Demo1"
More Tasks
| Task Name | Description |
|---|---|
|
executes all build-related tasks like |
|
prints arguments and options passed to compiler |
|
opens report for miniHIL performance statistics |
|
opens the feature report if available |
|
creates feature report if available |
| |
task* has configuration |
miniHIL FeatureReport
The task createFeatureReport will look for *.featurecov files within the MiniHilProject directory. For each existing featurecov file a feature report will be generated.
Currently 3 files are generated per feature report:
-
.html → human readable and navigable report.
-
.json → data source for the html report. While this file contains the report information in machine readable format we advice you not to use it as data source for custom tools. The feature report json api is not stable.
-
.xml → Machine readable version of the feature report. Format should be stable.
| |
These files are generated into MiniHilProject/build/tests/REPORT_NAME_Report.[html|json|xml]. |
Additional meta information may be supplied on the command-line. They will be added to the xml output:
// powershell example
// the following command will add a metaInfo block to the generated xml testreport
$gitHash = git rev-parse --verify --sq --short HEAD
.\gradlew.bat createFeatureReport --args="-em gitRev=$gitHash -em versionB=1.2.3"<metaInfo>
<gitRev>00da5ede</gitRev>
<versionB>1.2.3</versionB>
</metaInfo>miniHIL Performance Statistics
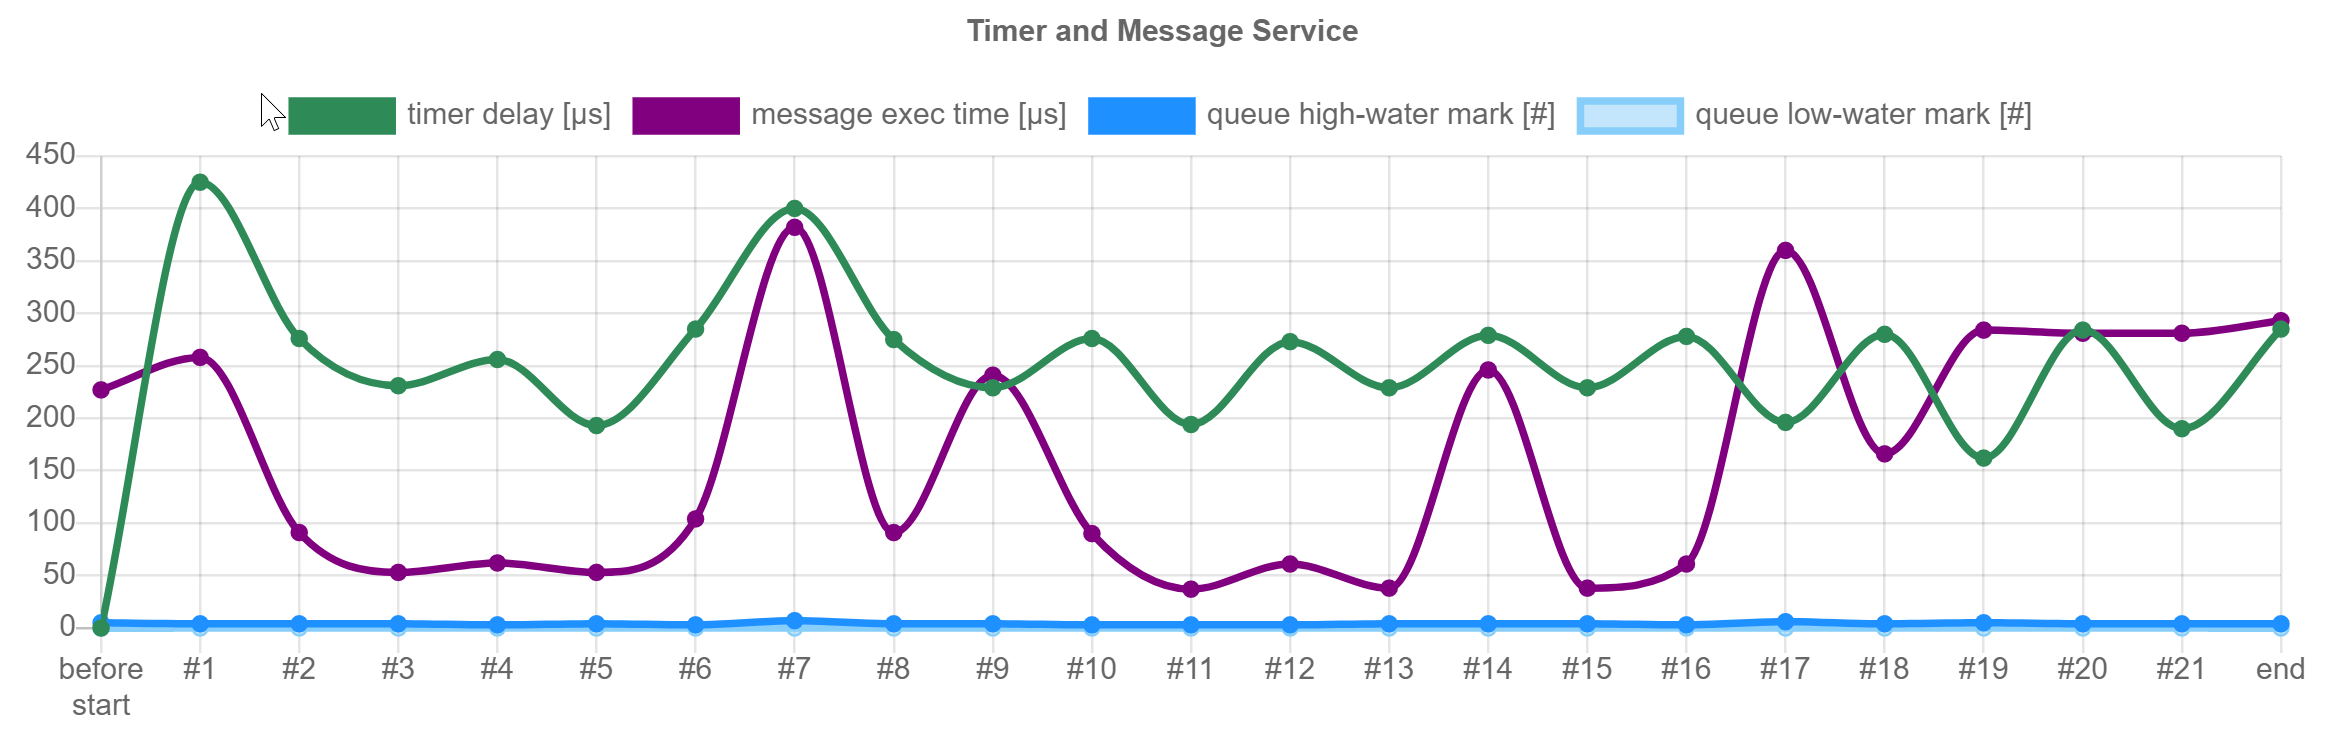
The task openStatistics will open a report that shows performance metrics that were collected during test execution. The task can be combined with runTests to open the report automatically after the test execution:
.\gradlew.bat runTests openStatistics
The first chart shows statistics for the timer service and the message queue. An unusable high peak in this chart can indicate a performance problem, e.g. high cpu load or cpu blocking.
The bottom chart show the usage of the buffers for various logging or trace outputs. Since performance and memory is a limited resource, the buffers are limited to a certain amount. The red-colored "x fails" label indicates a buffer overflow, which e.g. can be caused by sending too many text messages.
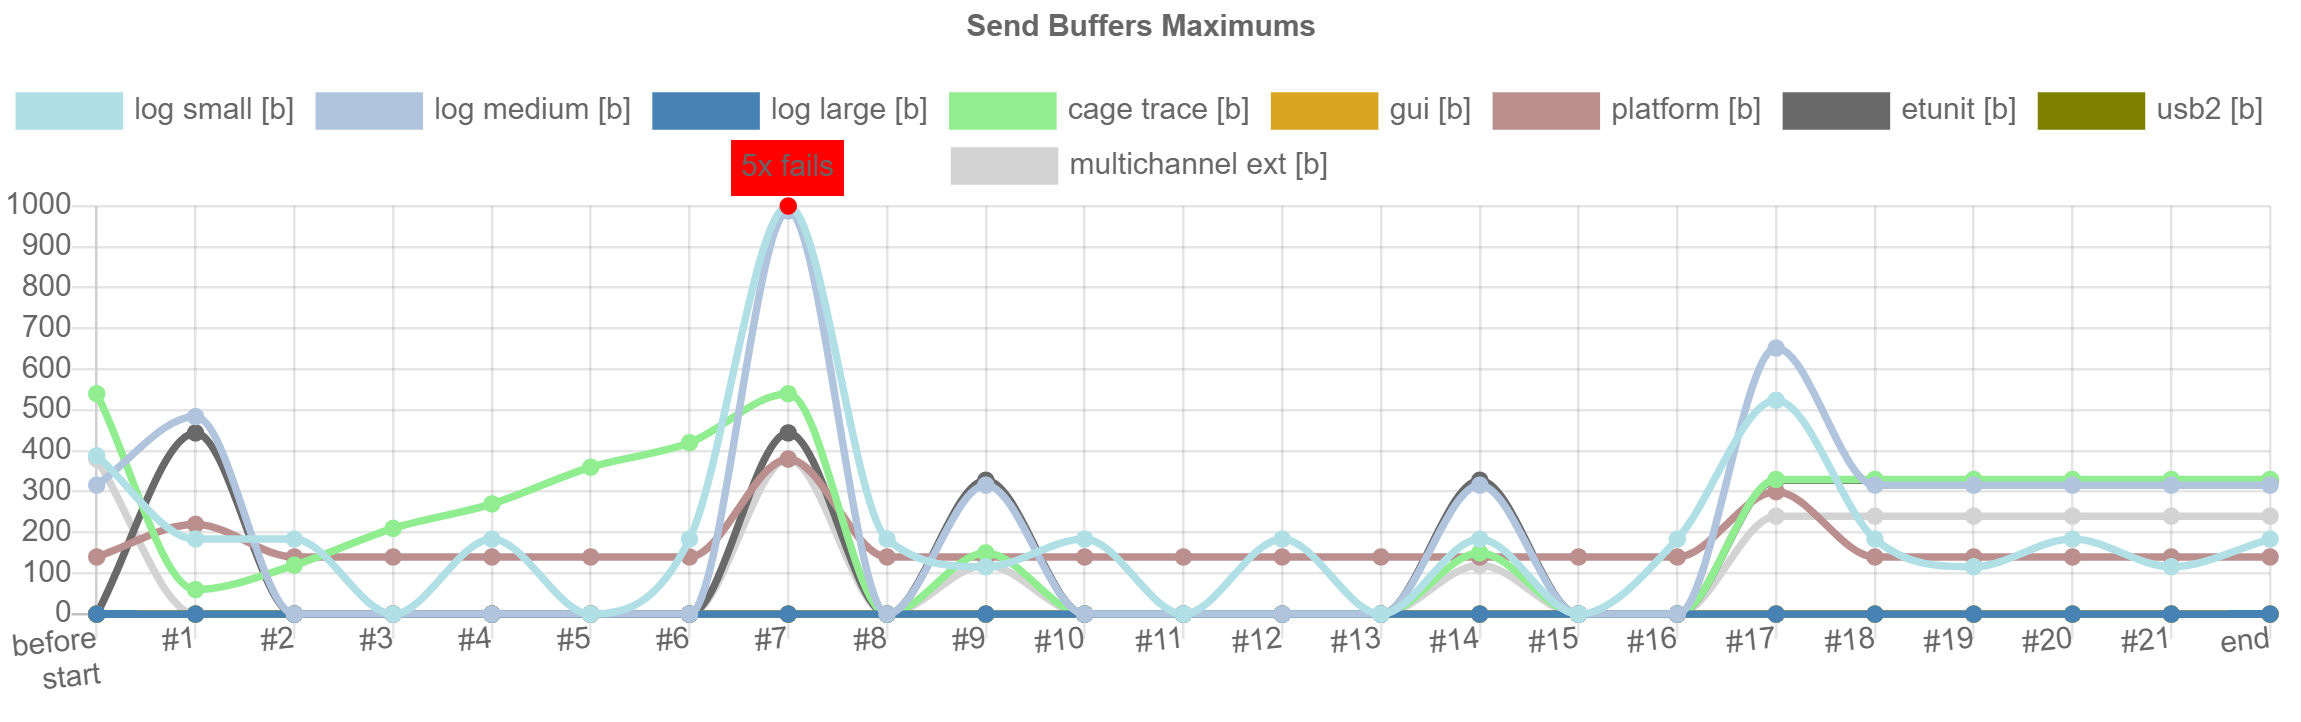
| |
The chart line may have different units. Any line can be hidden by clicking on its legend text above. |
Build Details
Organization Build Logic
The organization of the build logic is depicted below. The relevant files have the extension .gradle.
project ├── MiniHilProject │ └── build.gradle│ ├── CubeProject │ └── build.gradle
└── settings.gradle
minihilLib ├── gradle
├── SimModelLib
└── SimRuntime
|
Build files for the project executable, which can be customized by the user. |
|
'Root' build file for the entire projects. Applies common logic to all subprojects. |
|
Defines all projects participating into the build, see Hierarchical Build |
|
Build script library containing common or default scripts |
|
Libraries included in the build |
Eclipse Integration
Eclipse is configured to call the Gradle build. This is accomplished via two different configuration paths:
-
CDT Build: The CDT plugin invokes the gradle wrapper. The build action can be performed on its own or before a Run/Debug session.
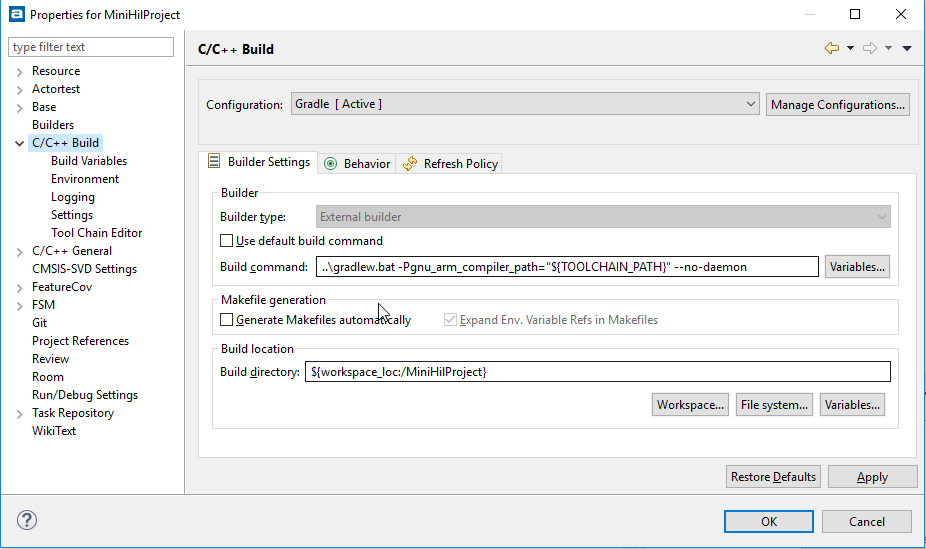
-
External Launch Configuration: Eclipse launches the gradle wrapper as an external tool process, specifying a Gradle task or set of Gradle tasks.
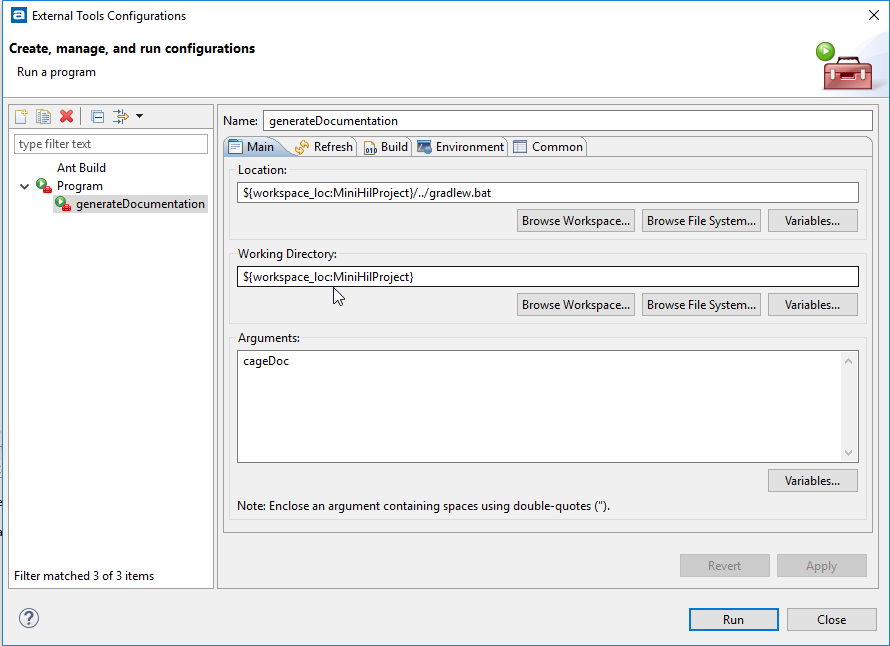
Default configurations are provided in the simulator hardware template project and also for the pc-based template project. Additional external launch configurations can be added to the miniHIL IDE workspace to invoke arbitrary Gradle tasks from the miniHIL build configuration.
Hierarchical Build
The build is organized into a multi-project build. The task projects can be used to print the projects included into the build.
> .\gradlew.bat projects

Root project 'Example'
+--- Project ':CubeProject'
+--- Project ':HilSimGUI'
+--- Project ':miniHilLib'
|    +--- Project ':miniHilLib:SimModelLib'
|    \--- Project ':miniHilLib:SimRuntime'
\--- Project ':MiniHilProject'